
Although I'm a beauty editor, I like to keep my skincare routine as simple as possible. A cleanser, serum, moisturiser and SPF are the only things I reach for on a day-to-day basis and I try not to add any other unnecessary steps. That being said, one thing I will make time for is gua sha.
Gua sha has a long history, but these tools have grown in popularity amongst beauty lovers over the past few years thanks to their purported ability to reduce inflammation and leave you with a firmer, more glowing complexion. I can attest that gua sha not only makes me look less puffy in the mornings, but it's also a really relaxing ritual that I always look forward to. However, after speaking to skincare experts, I realised that I was actually using my gua sha tool all wrong.
If you're thinking about investing in a gua sha tool and want to know how to use it properly and what benefits it could bring to your skincare routine, keep scrolling for all the info which I garnered from real experts on the matter.
What Is Gua Sha?

First things first, what is gua sha? Many people think this practice is relatively new, but it actually has a long and impressive history. "Gua sha is an ancient Chinese healing technique which has recently gained popularity in the Western beauty world for its ability to promote a healthy, glowing complexion and sculpted appearance," says Joanne Browne, training director at spa skincare brand ESPA. "It involves gently scraping the skin with a smooth-edged tool to stimulate circulation and lymphatic drainage. This practice, rooted in traditional Chinese medicine, has been used for centuries to alleviate muscle tension, reduce inflammation and promote overall wellbeing."
I was keen to learn more, so I reached out to Ada Ooi, founder of 001 Skincare and Chinese medicine expert. She told me that the gua sha method was originally known as Bian stone therapy, but this term was replaced as different types of stone techniques were developed. "The gua sha technique was found to be one of the oldest modalities and plays a significant role in the development of Chinese medicine," says Ooi. "Traditional gua sha involves targeting functional points along the meridian channels to realign organ system imbalance," Ooi explains. "This is usually supplemented with other Chinese medicine modalities such as acupuncture and herbs for optimal improvements."
What Benefits Does Gua Sha Have?
As mentioned, using a gua sha tool can help with lymphatic drainage. "The gentle scraping motions of gua sha help to stimulate the lymphatic system, encouraging the drainage of stagnant fluids that can contribute to puffiness and a dull complexion," explains Browne. It can also help improve circulation by increasing blood flow to the skin's surface, "promoting a healthy, radiant glow." Plus, much like a facial massage, gua sha helps release tension in the facial muscles and enhance product absorption. "Using a gua sha tool after applying skincare products such as serums or oils can help the skin better absorb the active ingredients, maximising their benefits," says Browne.
I'm sure you're curious whether using a gua sha tool can help tone your face, too. As explained by facialist and wellness expert Su-Man, "Scraping enhances circulation, providing undernourished areas with blood to both feed tissue and remove waste products. As an area is innervated, it will be detoxified and toned by the deep massaging action of the stroke." Kerry Stanniford, national trainer at Sisley, adds that gua sha can also stimulate the muscles, increasing firmness in the face and neck area. So, there are a lot of benefits. Yes, using a gua sha tool can help with puffiness and dullness, but it goes much deeper than this, helping to release tension and regulate bodily systems.

How to Use a Gua Sha Tool:
If you're keen to try gua sha for yourself, it's important to prep the skin well and use your tool correctly to reap the benefits. Apply a facial oil after cleansing to help the gua sha tool glide smoothly across the skin. "You can also soak the tool in hot water for 10 minutes to warm it up," says Ooi. "The warmth helps to de-stress and synergises the tool's energy to work with your body."
Then, go in with your facial tool. There are lots of different ways to use a gua sha tool, but below, you can find five expert-approved steps that are easy to try at home. Simply repeat each stroke five to 10 times.
1. The Neck
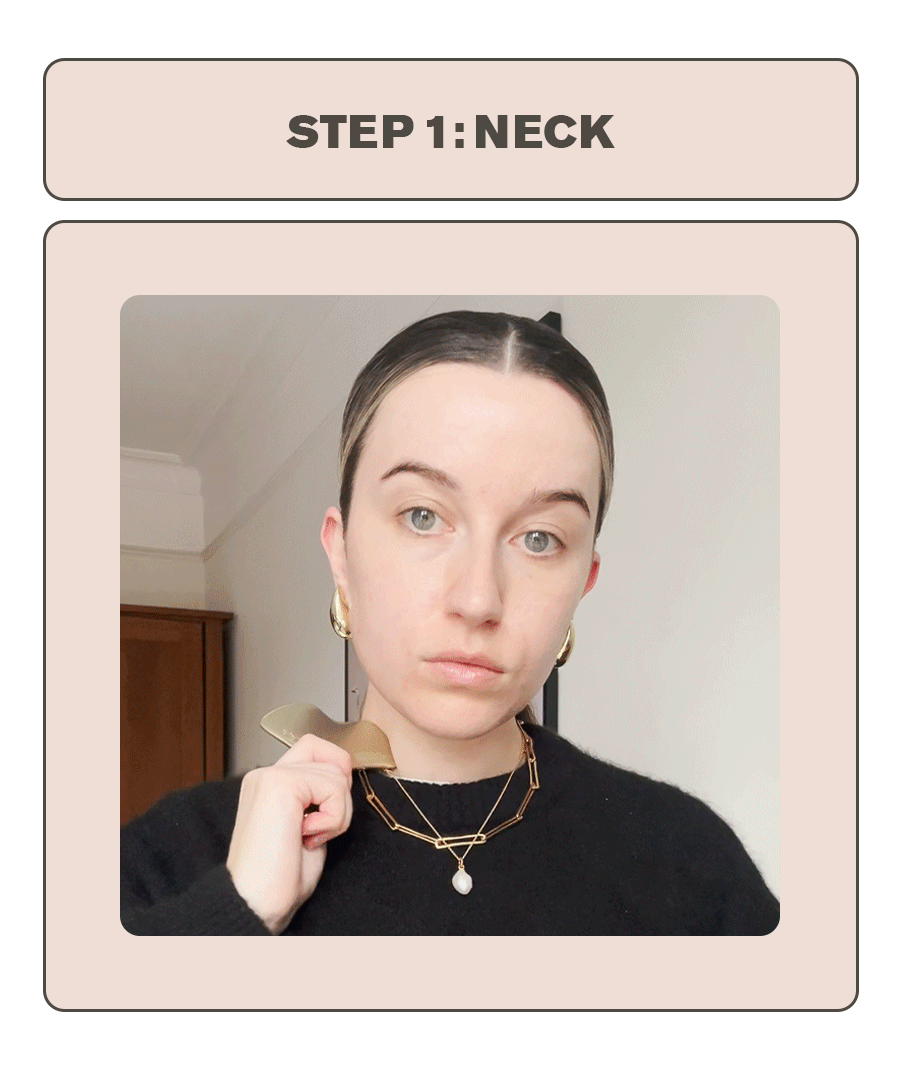
Start with the neck. "Begin at the base of your neck, near your collarbones," says Browne. "Using gentle pressure, glide the gua sha tool upwards towards your jawline in long, sweeping motions. Repeat five to 10 times on each side of your neck."
2. The Jawline and Chin
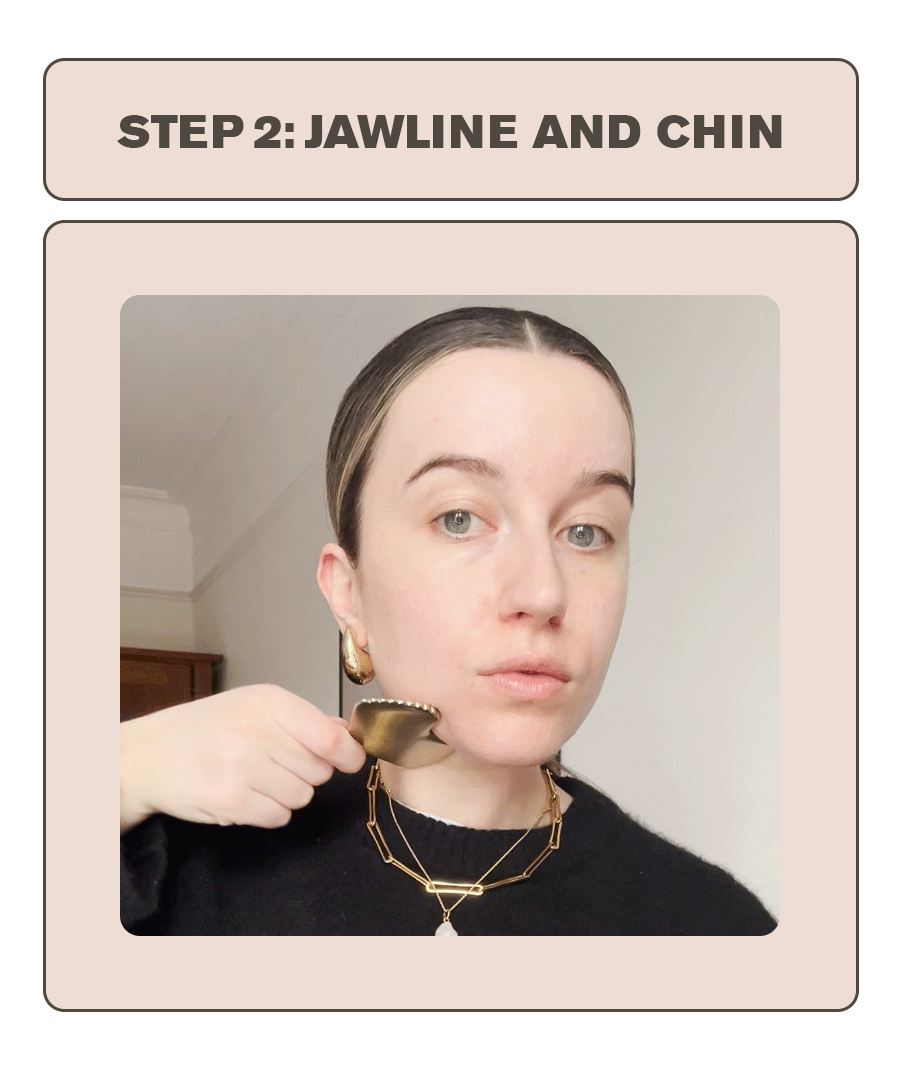
Then, place the gua sha tool flat against your chin and "glide it upwards along your jawline towards your earlobes." For added tension relief, Browne recommends wiggling the tool slightly at the end of each stroke.
3. The Cheeks
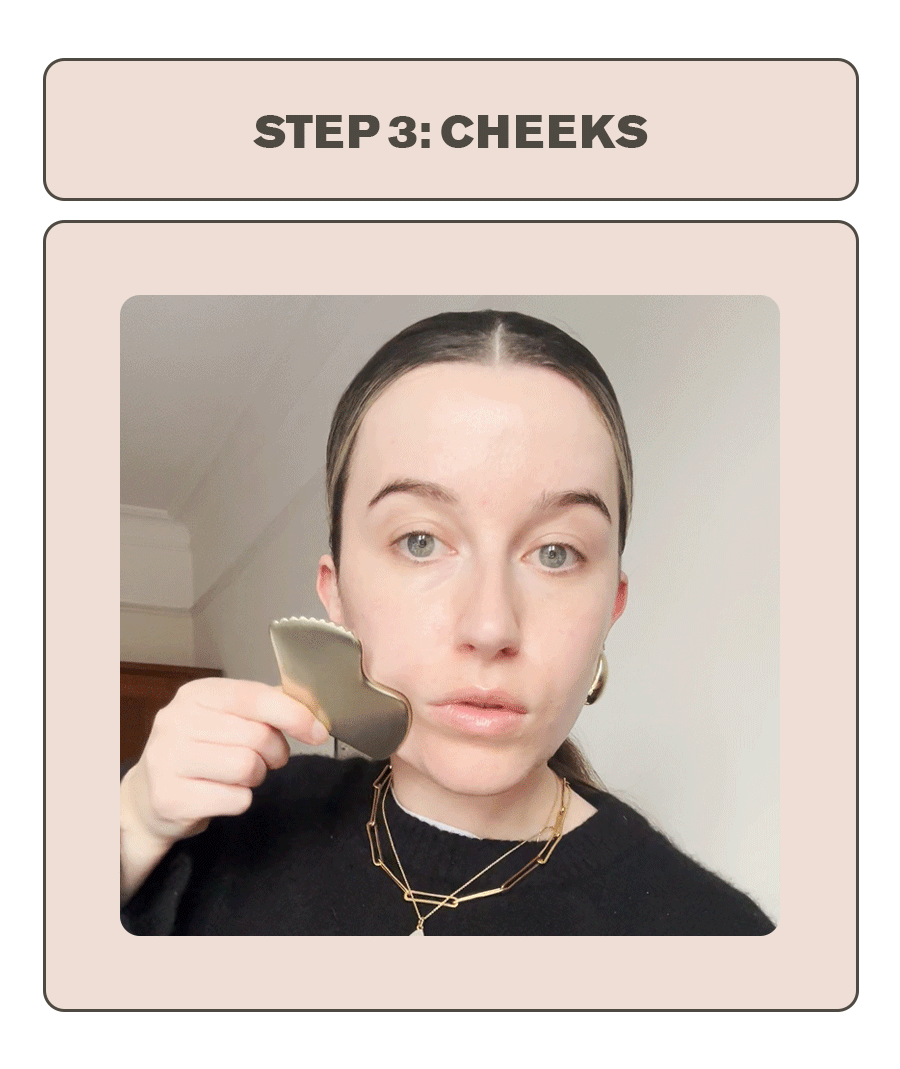
"Start at the centre of your chin and glide the gua sha tool outwards towards your temple, following the curve of your cheekbone," says Browne. "Use moderate pressure on this area for a sculpting effect."
4. The Brows
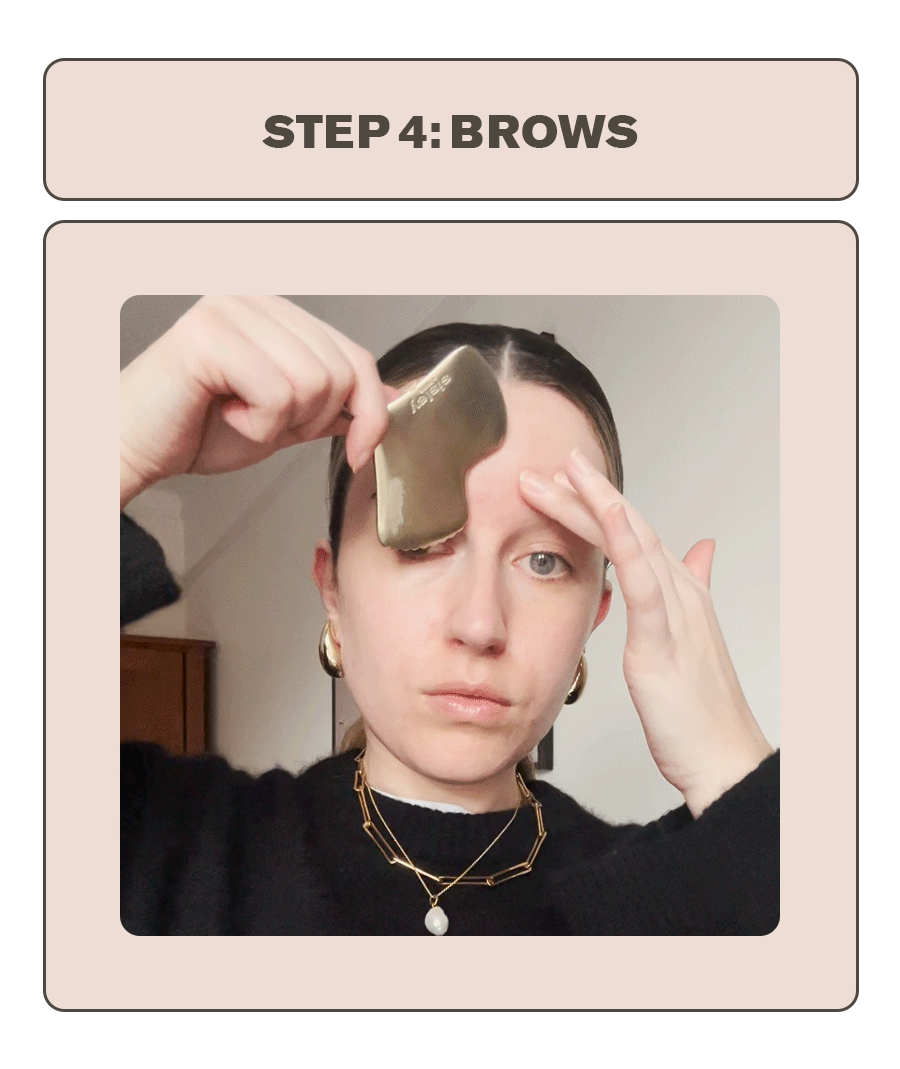
"Beginning at the inner corner of your eyebrow, glide the gua sha tool outwards along your brow bone towards your temple. This motion helps to lift and smooth the eye area."
5. The Under-Eyes
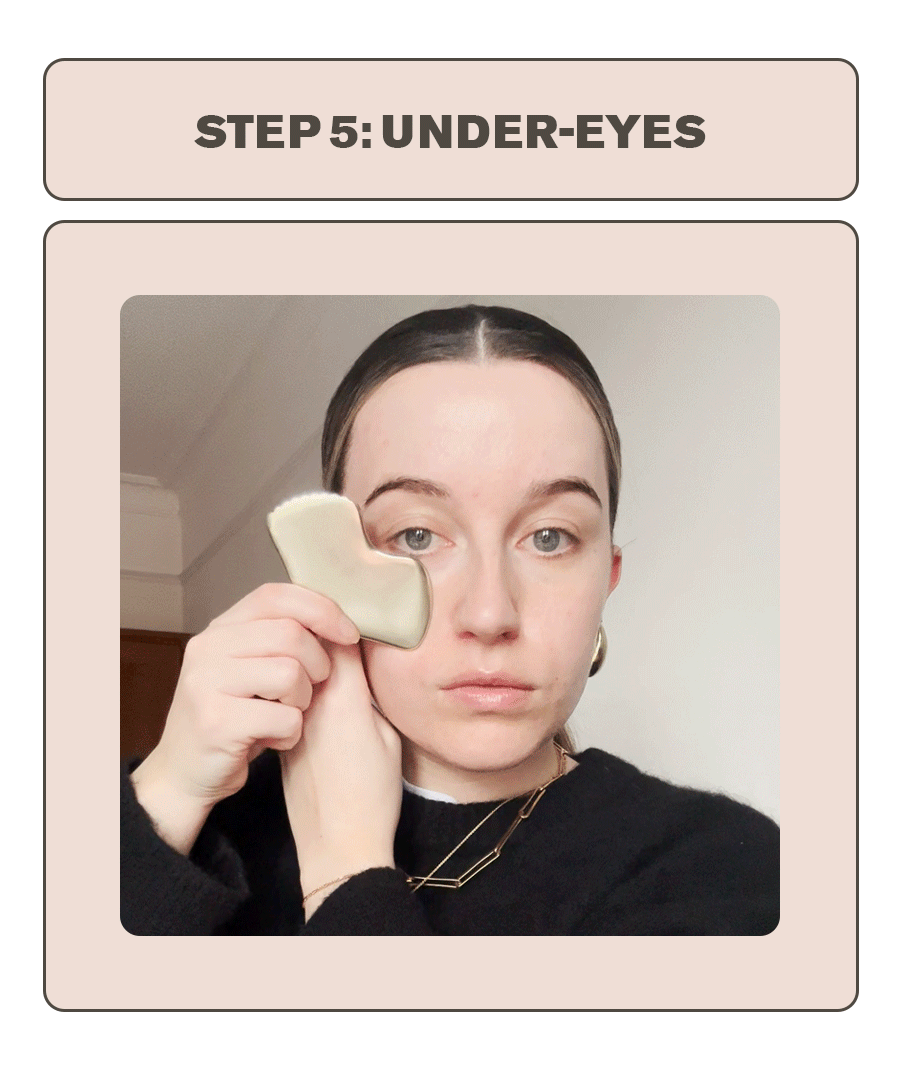
Finally, focus on the under-eyes. "Using very light pressure, start at the inner corner of your eye and gently glide the gua sha tool outwards towards your temple, following the orbital bone. Avoid putting any pressure directly on your eyeball."
For optimal results, Browne recommends performing this gua sha ritual two to three times per week, ideally in the morning or evening after cleansing. "As with any new practice, listen to your skin and adjust the frequency based on your needs and preferences." Once you've completed the routine, remove any excess oil with a clean, damp cloth and use your favourite moisturiser to lock in hydration.
Shop My Gua Sha Essentials:

This is the gua sha I use on a weekly basis. It's definitely an investment, but it feels incredible on the skin.

Don't forget to apply a facial oil before using a gua sha tool. This Templespa one is full of smoothing ingredients.

Browne says you can also use a serum like this Espa one to help the tool glide smoothly across the skin.

This facial tool from 001 Skincare has been designed to fit every facial contour and is made of polished, medical-grade natural Bian stone.

New to the world of gua sha? Why not try this affordable tool from Beauty Bay?

I've just invested in a gua sha tool for my body too.


-
 Derms Say This Is the Ultimate "Glass Skin" Ingredient, and You've Probably Never Heard of It
Here's the 411.
-
 There's Nothing Stopping Ballerina Alicia Mae Holloway From Soaring to New Heights
This dancer is living life with no limits.
-
 My Sister and I Have Opposite Skin Types, But These Products *Magically* Work for Both of Us
These are our "unicorn" products.
-
 I Polled Our Editor Slack Channel—10 French Beauty Products We’d Buy From Ulta’s Spring Sale
 -
 5 Underrated Pillars of Youthful and Glowing Skin, According to Zendaya's Facialist
I'm taking so many notes.
-
 Aestheticians on Instagram Can't Stop Raving About This Acne-Clearing Serum, so I Tried It
It's perfect for sensitive skin.
-
 I Just Visited the Rainforest—These Were the Beauty Products That Proved Essential
Travel dryness? I don't know her.
-
 The Numbers Don't Lie—WWW Readers Shop These 11 Products the Most, and They're on Sale RN
Saving on your faves is basically a profit… It's girl math.


